Konfigurieren des externen Routings von Salesforce-Nachrichten
- Eine Salesforce-Routing-Konfiguration mit External Routing als Routing-Modell
- Eine Salesforce-Warteschlange, die mit der externen Routing-Konfiguration und dem der Warteschlange zugewiesenen Messaging-Sitzungsobjekt verknüpft ist.
Nach Ihnen installieren und konfigurieren Erstellen Sie mit dem externen Omni-Channel-Routingpaket einen Flow in Salesforce, um eine Salesforce-Nachricht durch die Genesys Cloud zu leiten. Genesys Cloud leitet die Nachricht weiter und stellt sie dem entsprechenden Agenten zu. Der Agent bearbeitet die Nachricht innerhalb von Salesforce und kann die Nachricht auch an einen anderen Agenten weiterleiten. Genesys Cloud für Salesforce verwaltet den Lebenszyklus der Nachricht innerhalb von Genesys Cloud und erstellt einen Aktivitätsdatensatz in Salesforce, um alle wichtigen Informationen zu protokollieren.
Flow erstellen
Ein Fluss in Salesforce automatisiert den Weiterleitungsprozess. Sie verwenden Elemente, Verbindungselemente und Ressourcen, um einen Fluss aufzubauen. Weitere Informationen finden Sie unter Flows in der Salesforce-Dokumentation
- Erstellen Sie in Salesforce einen Fluss unter Verwendung der Vorlage Omni-Channel Flow (Beta).
- Unter Setupsuchen Sie in der Schnellsuche nach Flows und wählen Flows.
- Klicken Sie auf Neuer Fluss.
- Wählen Von vorne beginnen und klicken Sie auf Nächste .
- Unter Alle Flussarten , wählen Omni-Channel-Flow als Flusstyp und klicken Sie auf Erstellen.
- Um Elemente zur Leinwand hinzuzufügen, wählen Sie Freiform .
- Erstellen Sie die Datensatz-ID Und Eingabedatensatz Variablen, wie in der Salesforce-Dokumentation für Ihr Messaging-Sitzungsobjekt beschrieben.
- Ziehen Sie die Aktion Route Work (Beta) auf die Leinwand und geben Sie die Werte für die neue Aktion ein
- Geben Sie der Aktion ein Label und API Name und optional eine Beschreibung.
- Wählen Sie unter Set Input Values > RecordIDdie von Ihnen erstellte recordId aus
- Unter Servicekanal , wählen Sie den für Messaging erstellten Kanal aus.
- Wählen Sie unter Route To, Queue.
- Unter Warteschlange Geben Sie die Salesforce-Warteschlangen-ID ein, die Sie über Genesys Cloud weiterleiten möchten.
- Klicken Sie auf Erledigt.
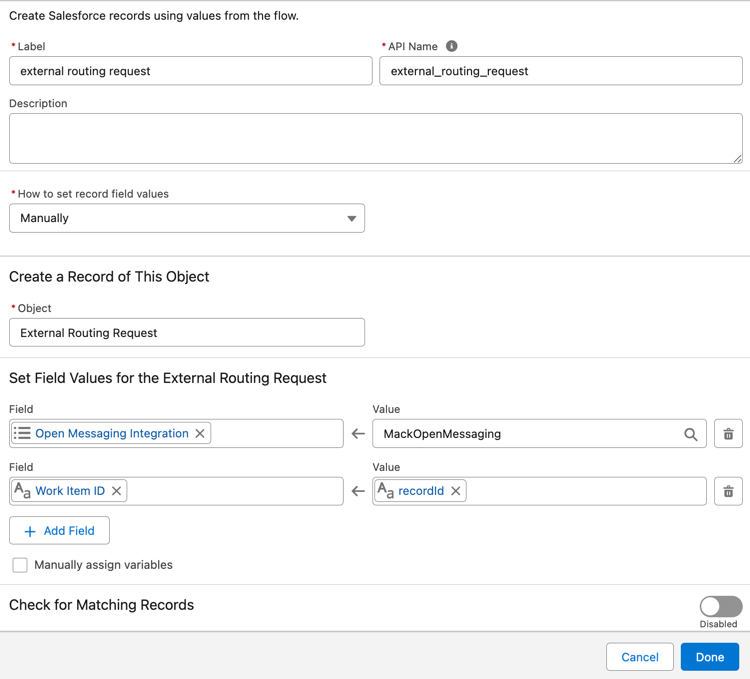
- Ziehen Sie die Aktion Datensätze erstellen auf die Leinwand und geben Sie die Details des Datensatzes ein

-
- Geben Sie einen Namen für den Datensatz ein.
- Wählen Sie die Option Manuell um die Datensatzfelder zu konfigurieren.
- Wählen Sie das Objekt External Routing Request aus der Liste aus
- Fügen Sie die beiden Felder Open_Messaging_Integration__c und Work_Item_ID__c hinzu und setzen Sie die Werte für die Felder.
- Open Messaging Integration - Wählen Sie die aus der Genesys Cloud abgerufenen Werte der Auswahlliste
- Arbeitselement-ID – Wählen Sie die RecordId-Variable aus, die Sie für das Messaging-Sitzungsobjekt erstellt haben.
- Optional können Sie auch das Feld Benutzerdefinierte_Attribute__c und die Werte im Format
customAttribute1=customAttr1, customAttribute2=customAttr2. Wenn Sie Salesforce-Objekte hinzufügen, verwenden Sie das FormatcustomAttribute={!Object.Value}. - Klicken Sie auf Erledigt.
Notiz : Sie können die Nachrichtenattribute des externen Routing-Pakets imOpenMessageService.apxcDatei mit Ausnahme des benutzerdefinierten Attributs,SF_ExternalRoutingWorkItemId. Stellen Sie sicher, dass Sie das benutzerdefinierte Attribut nicht bearbeiten oder entfernen.SF_ExternalRoutingWorkItemId. Sehen Eingehende offene Nachrichten Weitere Informationen zur API, auf die das Routing-Paket verweist. -
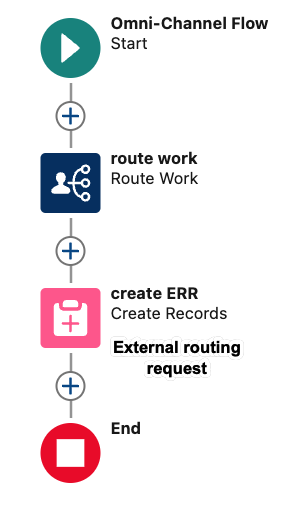
- Verbinden Sie das Element Start mit dem Aktionselement Route Work (Beta) im Ablauf.
- Verbinden Sie das Routenarbeit Aktionselement zum Datensatz erstellen Element im Fluss.

- Klicken Sie auf Speichern.
- Klicken Sie auf Aktivieren Sie.
Aktivieren Sie den Fluss Löschantrag
Das Paket für externes Routing enthält den Ablauf "External Routing Request Deletion". Dieser Ablauf bereinigt die Anforderungssätze, die erstellt werden, wenn einer der folgenden Fälle eintritt:
- Getrennte Workitems, die erfolgreich weitergeleitet und abgeschlossen werden.
- Der Benutzer schließt die Nachricht, bevor sie an einen Agenten weitergeleitet wird.
Aktivieren Sie diesen Fluss, bevor Sie das externe Routing verwenden.
- Suchen Sie im Salesforce Setup nach Flows.
- Klicken Sie in der Liste der Bewegungen auf External Routing Request Deletion.
- Klicken Sie auf Aktivieren Sie.
Einrichten für Messaging für In-App und Web
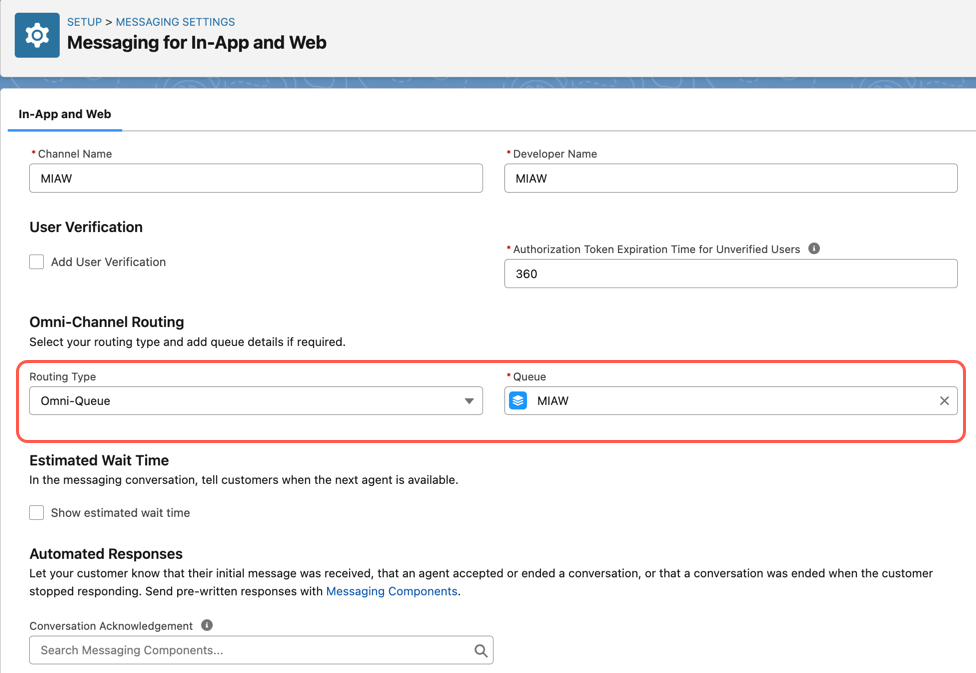
Erstellen Sie einen Nachrichtenkanal für In-App- und Web-Messaging und stellen Sie sicher, dass Sie die folgenden Details für den Nachrichtenkanal auswählen:
- Wählen Omni-Warteschlange als die Routing-Typ . Wählen Sie den erstellten Flow aus, um eine Salesforce-Nachricht durch Genesys Cloud zu leiten.
- Wählen Sie die für Messaging für In-App und Web erstellte Fallback-Warteschlange aus.

Erstellen einer eingebetteten Servicebereitstellung
Nachdem Sie den Nachrichtenkanal erstellt haben, können Sie ihn mit einer neuen eingebetteten Bereitstellung mit einer Website verbinden:
- Ermöglichen Sie digitale Erlebnisse. Sehen Digitale Erlebnisse ermöglichen .
- Erstellen Sie eine Webbereitstellung für die Messaging-Sitzung mit Ihrem Endbenutzer. Stellen Sie sicher, dass Sie die Option „Messaging für In-App und Web“ und den Messaging-Kanal auswählen. Sehen Konfigurieren einer Messaging-Funktion für die Webbereitstellung .
- Veröffentlichen Sie die Webbereitstellung.
- Fügen Sie Ihren Codeausschnitt hinzu für Einbetten von Nachrichten auf einer externen Website.
- Fügen Sie Ihre Domäne zur CORS-Zulassungsliste hinzu.
- Fügen Sie Ihrem Agenten die Messaging-Konsole hinzu. Sehen Messaging zur Servicekonsole hinzufügen .
Chat-Schaltflächen erstellen (Legacy)
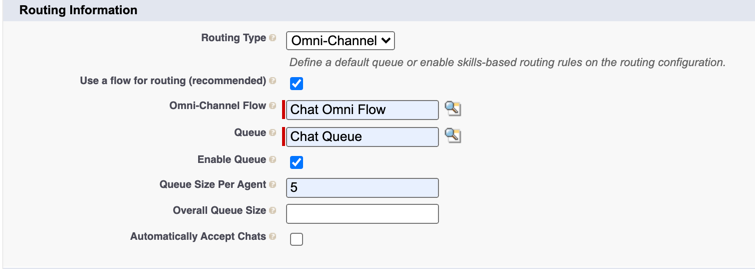
Wenn Sie Chat-Schaltflächen in Salesforce erstellen, können Sie unter festlegen, wie die eingehenden Chat-Anfragen an Agenten weitergeleitet werden Wählen Sie in der Einstellung für die Salesforce-Chat-Schaltfläche Omni-Channel im Feld Routing-Typ und verwenden Sie den Omni-Channel-Fluss, der für das Routing der spezifischen Warteschlange erstellt wurde.

Weitere Informationen über die Verwendung von Omni-Channel-Synchronisierungseinstellungen finden Sie unter Verwendung von Omni-Channel-Synchronisierung.
Weitere Informationen über die Integration finden Sie unter Über Genesys Cloud für Salesforce.

