
Serie: Einrichten von CX Cloud, Digital und KI für Salesforce Service Cloud Voice
Anwesenheitsstatus erstellen und Benutzerprofilen zuweisen
- Zuweisen von Sicherheit auf Feldebene
- CX Cloud, Digital und KI für Salesforce Service Cloud einrichten
- Erstellen Sie Servicekanäle
- Zuweisen von Sicherheit auf Feldebene
- Erstellen von Präsenzbenutzer- und Routingkonfigurationen
- Erstellen Sie Sicherungswarteschlangen für die Flows
- Erstellen Sie Flows zum Weiterleiten von Experience- und Email Experience-Objekten
- Erstellen Sie Datensatzseiten für die Experience-Objekte
- Erstellen eines OAuth-Clients für Salesforce Service Cloud Voice
- Integrieren Sie Einstein Next Best Action in Salesforce
- Erstellen Sie eine Lightning-App für Digital und KI für Salesforce Service Cloud
- Erstellen von Präsenzbenutzer- und Routingkonfigurationen
Erstellen Sie in Salesforce Anwesenheitsstatus und weisen Sie diese den Benutzerprofilen zu. Erstellen Sie die folgenden Anwesenheitsstatus, die mit dem Genesys Cloud Messaging-Dienstkanal verbunden sind:
- Verfügbar
- Verfügbar in der Warteschlange
- Beschäftigt
Hinweis: Wenn Sie bereits Anwesenheitsstatus für die Einrichtung eines Contact Centers müssen Sie keine neuen Anwesenheitsstatus erstellen. Fügen Sie die neu erstellten Servicekanäle den vorhandenen verfügbaren Status hinzu, die Ihre Agenten bei der Bearbeitung von Chats verwenden sollen.
So erstellen Sie den Anwesenheitsstatus „Verfügbar“:
- Suchen Sie auf der Setup-Startseite im Feld „Schnellsuche“ nach Anwesenheitsstatus und klicken Sie auf Anwesenheitsstatus .
- Klicken Sie auf Neu.
- Unter dem Grundinformation geben Sie den Statusname als Verfügbar .
- Unter dem Statusoptionen wählen Sie Online .
- Unter dem Servicekanäle Wählen Sie im Abschnitt die Servicekanäle aus, z. B. Genesys Cloud-E-Mail , Genesys Cloud Messaging , Nachrichten , Und Telefon im Verfügbare Kanäle Liste.
- Klicken Hinzufügen , um die ausgewählten Servicekanäle in den Ausgewählte Kanäle Liste.
Klicken Sie auf das Bild, um es zu vergrößern.
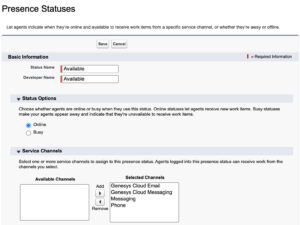
- Klicken Sie auf Speichern.
So erstellen Sie den Dienstpräsenzstatus „In Warteschlange verfügbar“:
- Suchen Sie auf der Setup-Startseite im Feld „Schnellsuche“ nach Anwesenheitsstatus und klicken Sie auf Anwesenheitsstatus .
- Klicken Sie auf Neu.
- Unter dem Grundinformation geben Sie den Statusname als Verfügbar in der Warteschlange .
- Unter dem Statusoptionen wählen Sie Online .
- Unter dem Servicekanäle Wählen Sie im Abschnitt die Servicekanäle aus, z. B. Genesys Cloud-E-Mail , Genesys Cloud Messaging , Nachrichten , Und Telefon im Verfügbare Kanäle Liste.
- Klicken Hinzufügen , um die ausgewählten Servicekanäle in den Ausgewählte Kanäle Liste.
- Klicken Sie auf Speichern.
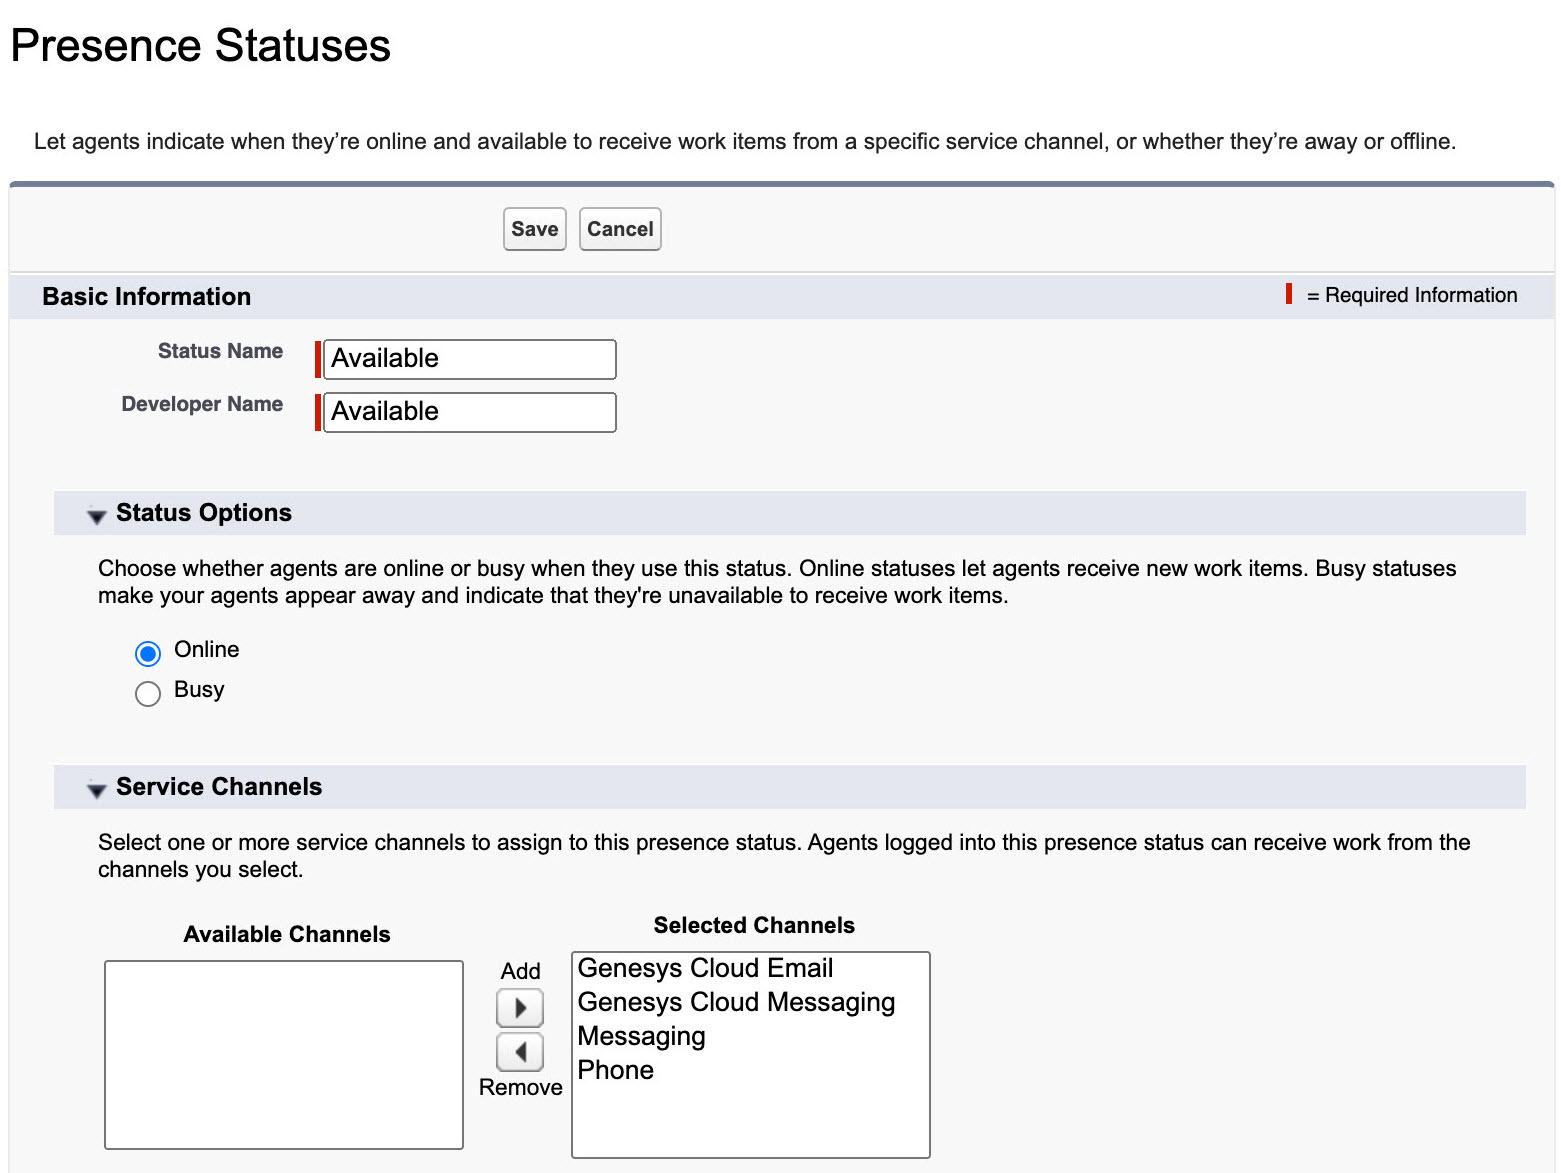
So erstellen Sie den Anwesenheitsstatus „Beschäftigt“:
- Suchen Sie auf der Setup-Startseite im Feld „Schnellsuche“ nach Anwesenheitsstatus und klicken Sie auf Anwesenheitsstatus .
- Klicken Sie auf Neu.
- Unter dem Grundinformation geben Sie den Statusname als Beschäftigt .
- Unter dem Statusoptionen wählen Sie Beschäftigt .
Klicken Sie auf das Bild, um es zu vergrößern.
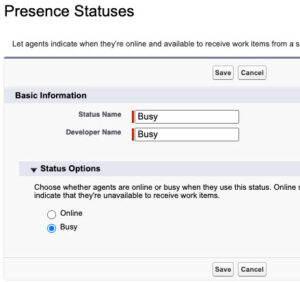
- Klicken Sie auf Speichern.
Zuweisen von Service-Präsenzstatus zu Benutzerprofilen
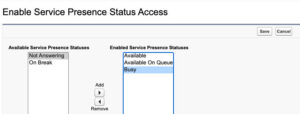
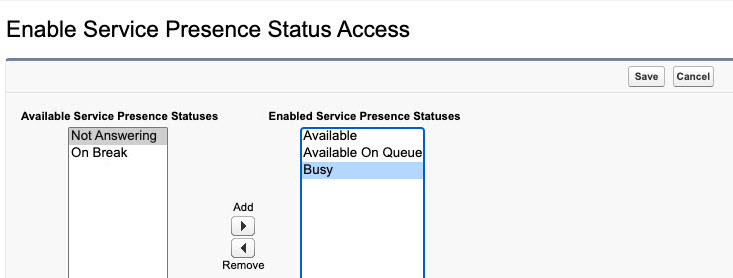
So weisen Sie den Benutzerprofilen die Dienstpräsenzstatus zu:
- Suchen Sie auf der Setup-Startseite im Feld „Schnellsuche“ nach „Profile“ und klicken Sie auf Profile .
- Klicken Sie auf ein Agentenprofil, um dessen Einstellungen zu öffnen.Hinweis: Klicken Sie nicht auf das Bearbeiten Verknüpfung.
- Drücke den Zugriff auf den Service-Präsenzstatus aktivieren Verknüpfung.
- Klicken Bearbeiten .
- Unter dem Verfügbare Servicepräsenzstatus Wählen Sie die Servicepräsenzstatus aus, wie z. B. Verfügbar , Verfügbar in der Warteschlange , Und Beschäftigt .
- Klicken Hinzufügen um die ausgewählten Service-Präsenzstatus zum Benutzerprofil hinzuzufügen.
Klicken Sie auf das Bild, um es zu vergrößern.
- Klicken Sie auf Speichern.
Zuweisen von Sicherheit auf Feldebene :Vorheriger vorgeschlagener Artikel Nächster vorgeschlagener Artikel: Erstellen von Präsenzbenutzer- und Routingkonfigurationen